Dismantling wardrobes for moving, for most UK home moves, you should dismantle your wardrobe rather than move it whole. The only exceptions are solid wood freestanding pieces that clearly fit through every doorway and stairwell, and where you have enough people to lift safely. For everything else, the plan is straightforward: remove doors first, then work top → sides → base → back panel, bag every fixing, label every panel, and you’re ready to load. IKEA PAX and similar flat-pack units almost always come apart without specialist tools. Fitted wardrobes need a bit more care around wall fixings, but the same logic applies. If you’d rather hand it all over, Van-247delivery offers a professional disassembly, transport and reassembly service across the UK.
Quick decision rule:
- Flat-pack (IKEA PAX, Brimnes, Hemnes): dismantle every time.
- Solid wood freestanding: measure first; move whole only if the route is clear and you have lifting help.
- Fitted/built-in: always dismantle; wall fixings make moving whole impossible.
Pro Tip: Before you touch a single screw, photograph the wardrobe from every angle, including close-ups of hinge positions and cam orientations. You’ll thank yourself at the other end.
Key takeaways
Dismantling wardrobes for moving is safe and manageable when you follow the right sequence: measure first, remove doors before anything else, bag and label every fixing, and protect panels for transit.
| Point | Details |
|---|---|
| Measure before deciding | Check height, width, depth and diagonal clearance against every doorway and stairwell before choosing to dismantle or move whole. |
| Doors always come off first | Remove hinged or sliding doors before touching the carcass to reduce weight and prevent panel damage. |
| Bag, label and tape fixings | Tape each labelled hardware bag to the largest panel it belongs to; this prevents missing cam bolts at reassembly. |
| Protect panels for transit | Stack panels with blankets between each one, use corner protectors, and secure with load straps in the van. |
| Van-247delivery for professional help | Van-247delivery offers UK-wide disassembly, insured transport and reassembly, with instant online quotes and optional two-person teams. |
Table of Contents
- Should you dismantle the wardrobe or move it whole?
- What tools and materials do you need before you start?
- How to dismantle a flat-pack wardrobe step by step
- How to dismantle fitted and solid wood wardrobes safely
- How do you remove hinged, sliding and mirrored doors safely?
- What do you do when cam locks, dowels or panels won’t budge?
- Labelling, packing and loading panels into the van
- How to reassemble wardrobes at the destination without headaches
- When should you hire a removals or man-and-van service in the UK?
- A mover’s honest perspective on wardrobe jobs
- Van-247delivery handles the whole job for you
- Sources
- FAQ
Should you dismantle the wardrobe or move it whole?
The answer almost always comes down to three things: measurements, construction type, and how many people you have.
Measure everything first. Compare the wardrobe’s height, width and depth against every doorway, corridor and stairwell it needs to pass through. Crucially, check the diagonal clearance too, because tall units often need to be tilted to navigate a staircase, and the diagonal measurement is larger than the height alone.
Construction type tells you a lot:
- Flat-pack (IKEA PAX, Brimnes, Hemnes): designed to come apart; cam locks and dowels separate cleanly with basic tools.
- Solid wood freestanding: heavy and often glued at joints; moving whole is possible if the route is clear, but two strong people are the minimum.
- Fitted/built-in: fixed to walls with battens or screws through the back panel; dismantling is not optional.
When moving whole is reasonable:
- Every doorway, corridor and stairwell is wider than the wardrobe by at least 5 cm on each side.
- You have three or more people to lift and manoeuvre.
- Protective wrapping (moving blankets, corner protectors) is available.
The risk trade-offs are real. Chipboard edges chip easily when a unit is forced through a tight turn. Swollen dowels can split if the carcass flexes under its own weight during transit. And the time cost of repairing a damaged wardrobe often exceeds the time saved by not dismantling it.
What tools and materials do you need before you start part of dismantling wardrobes for moving?
Getting the right kit together before you begin saves you stopping mid-job to hunt for an Allen key. Here’s what you need:
Tools:
- Phillips and flathead screwdrivers
- Allen keys (a set covering 3 mm, 4 mm, 5 mm and 6 mm covers most flat-pack wardrobes)
- Cordless drill with screwdriver bit (optional but faster)
- Rubber mallet
- Flat-nose pliers
- Small torch (for spotting hidden fixings inside dark carcasses)
Materials:
- Moving blankets or old duvets
- Masking tape and a marker pen
- Zip-lock bags (one per panel or fitting group)
- Corner protectors or folded cardboard
- Bubble wrap for mirrored panels
Prep checklist before you touch a screw:
- Empty the wardrobe completely, including shelves and drawers.
- Remove loose shelves, hanging rails and drawers separately.
- Photograph all fittings, hinge positions and cam orientations.
- Clear a floor area large enough to lay panels flat.
- Get a helper; large side panels are awkward and heavy for one person.
Safety reminders: bend your knees when lifting panels, not your back. Secure the unit against a wall before removing any wall fixings. Wear work gloves to protect against sharp chipboard edges. Keep children and pets out of the room.
Pro Tip: Label your zip-lock bags before you start filling them, not after. Write the panel name on the bag (‘left side hinge screws’, ‘top rail cams’) while you can still see where each fixing came from.
How to dismantle a flat-pack wardrobe step by step part of dismantling wardrobes for moving
Most flat-pack wardrobes come apart in 30–60 minutes with two people and basic tools. Double or complex units with multiple sections can take up to 2–3 hours. Work through the sequence below and you won’t need to guess.
Removing doors and interior fittings
- Hinged doors: open the door fully, support it with one hand (or have a helper hold it), and unscrew the hinge plates from the frame. Keep the hinge screws with the door in a labelled bag.
- Sliding doors: lift the door upward into the top track, then swing the bottom edge out and lower it free. Check for soft-close runners and remove those separately.
- Interior fittings: remove drawers, hanging rails and loose shelves. These travel separately and protect the panels from scratching each other.
Dismantling the carcass
- Top panel: locate the cam locks along the top edge of the side panels. Turn each cam anticlockwise with a flathead screwdriver until it disengages, then check for dowels before pulling the panel free.
- Side panels: repeat the cam-lock process. Work one side at a time and have your helper steady the opposite side.
- Base panel: same process as the top. Once the sides are free, the base lifts away cleanly.
- Back panel: usually held by staples or small nails into the back edge of the side panels. Gently prise it free with a flathead screwdriver.
IKEA PAX-specific notes
- Remove the front top rail and any wall-safety bracket before attempting the top panel.
- Soft-close door runners are clipped onto the frame; unclip them before removing the doors or you risk bending the runner.
- PAX units often have a separate plinth at the base; unscrew this first.
Pro Tip: Tape each labelled hardware bag directly to the largest panel it belongs to. This single habit prevents the most common reassembly failure: missing cam bolts or hinge screws.
How to dismantle fitted and solid wood wardrobes safely part of dismantling wardrobes for moving
Fitted wardrobes are fixed to walls, so the sequence matters more here. Rushing risks pulling plasterboard away with the unit.
- Remove doors and decorative fascias first. This exposes the fixings and reduces the weight of the carcass while you work.
- Locate wall fixings. These are usually screws through a top batten into the wall, or screws through the back panel. Use your torch to find them all before removing any.
- Unscrew wall fixings gradually, one side at a time, while a helper supports the carcass from the front to prevent it tipping forward.
- Free the unit from the base. Some fitted units sit on a plinth screwed to the floor; unscrew this last.
- Lift the carcass clear once all fixings are removed. Two people are the minimum for any section wider than 60 cm.
After removal: fill screw holes with the right filler for your wall type. Use plasterboard filler for plasterboard walls and lime or a suitable filler for older solid walls, and allow it to dry fully before painting.
Pro Tip: If the back panel is screwed directly into a plasterboard wall, score around the screw heads with a Stanley knife before removing them. This stops the paper face of the plasterboard tearing when the screw pulls through.
How do you remove hinged, sliding and mirrored doors safely part of dismantling wardrobes for moving?
Doors are the most awkward part to handle because they’re large, heavy and fragile. Getting the removal right saves you a cracked mirror or a chipped frame.
Hinged doors:
- Open fully and have a helper hold the door at the outer edge.
- Unscrew hinge plates from the frame (not from the door itself), starting with the bottom hinge.
- Keep hinge screws in a labelled bag taped to the door.
Sliding doors:
- Lift the door firmly upward into the top track until the bottom edge clears the bottom rail.
- Swing the bottom edge outward and lower the door free.
- Remove soft-close runners by unclipping them from the frame before the door comes off.
Mirrored doors:
- Cover the mirror face with a sheet of cardboard first, secured with masking tape at the edges.
- Wrap the whole door in a moving blanket and tape it closed.
- Never transport mirrored doors with the glass face exposed; even minor vibration can cause hairline cracks.
Storage and transit: lay doors flat between blankets, or stand them upright against the van wall with padding between each door. For tips on protecting fragile panels during transit, the Van-247delivery guide on moving artwork and fragile items covers the same principles well.
Pro Tip: Stand mirrored doors upright in the van rather than flat. A door laid flat is at risk from anything placed on top of it; upright and secured, it’s far safer.
What do you do when cam locks, dowels or panels won’t budge info from dismantling wardrobes for moving?
Stuck joints are the most common reason people damage wardrobes during a move. The fix is almost always patience and the right technique, not more force.
- Check for hidden fixings first. Before applying any pressure, shine your torch inside the carcass and along every edge. A single missed screw is usually the culprit.
- Turn cam locks fully anticlockwise with a flathead screwdriver. The cam should rotate until you feel it disengage. If it feels stiff, the cam may be slightly misaligned; try a gentle clockwise nudge first, then anticlockwise again.
- Rock the panel gently side to side while pulling. This breaks the friction seal without stressing the chipboard.
- Use a rubber mallet on the joint, not the panel face. A rubber mallet tapped at the joint is a low-risk way to free swollen dowels or stuck cam joints without splitting chipboard.
- Stubborn dowels: grip the dowel with flat-nose pliers and rock it gently rather than pulling straight out. Pulling straight risks splitting the hole.
When to stop and call a professional: if the chipboard around a cam hole is starting to strip, if panels creak under pressure, or if you suspect the unit has been glued at the joints, stop. Further force causes irreversible damage. A wardrobe disassembly service is cheaper than replacing a wardrobe.
Labelling, packing and loading panels into the van part of dismantling wardrobes for moving
Good labelling takes five minutes and saves an hour of confusion at the other end. Here’s the system that works:
Labelling:
- Write panel names on masking tape with a marker (‘left side’, ‘top’, ‘shelf 2 of 3’, ‘back panel’).
- Tape the corresponding hardware bag to the largest panel it belongs to.
- Number panels if you’re dismantling more than one wardrobe (‘WD1 left side’, ‘WD2 left side’).
Packing sequence:
- Mirrored and glass doors: cardboard over the face, then a moving blanket, then tape.
- Flat panels: stack with a moving blanket or sheet of cardboard between each panel to prevent scratching.
- Corner protectors on all four corners of large panels; chipboard edges are the first thing to chip.
Van loading:
| Panel type | Best position in van | Why |
|---|---|---|
| Large side panels | Upright against van wall | Reduces flex and edge chipping |
| Back panel (thin) | Between two larger panels | Prevents crushing |
| Doors | Upright or flat between blankets | Protects glass and finish |
| Hardware bags | In a labelled box, not loose | Stops bags sliding under panels |
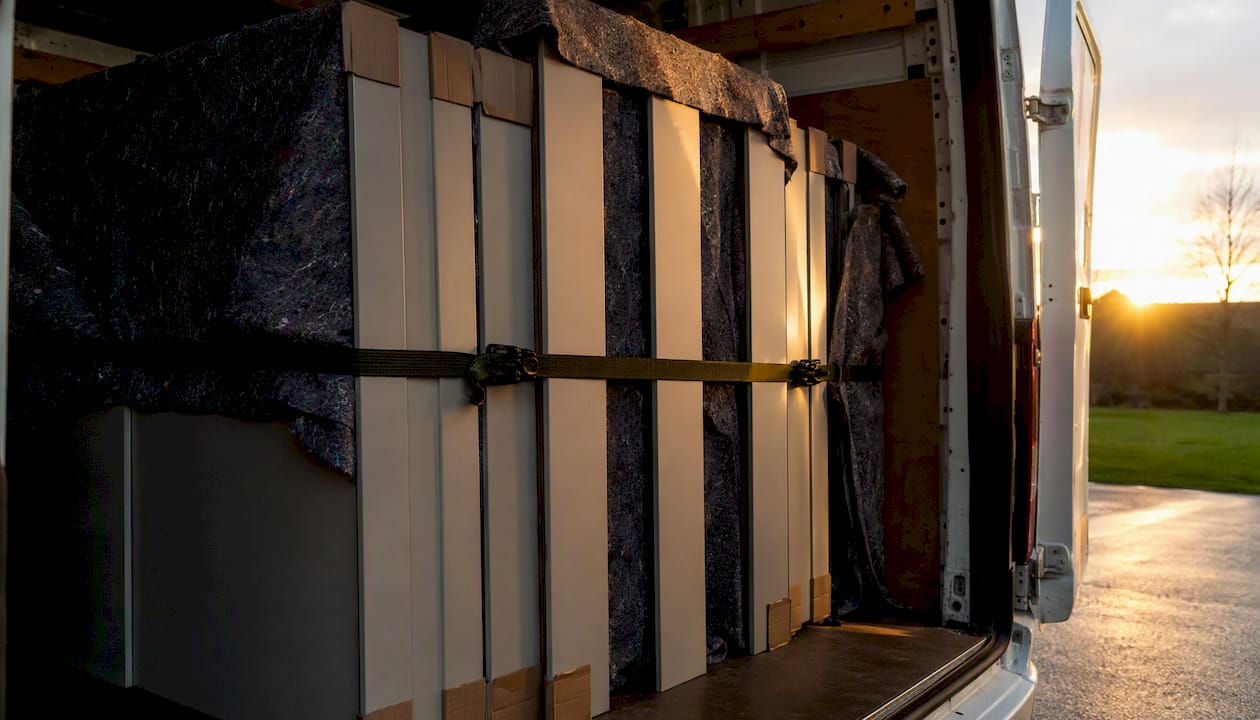
Secure everything with load straps. For more on protecting furniture during transit, including long-distance moves, the principles of padding and securing apply equally to wardrobe panels.
How to reassemble wardrobes at the destination without headaches part of dismantling wardrobes for moving
Assemble large furniture close to its final wall position before you start building. Moving a half-assembled wardrobe scratches floors and strains joints. Also, prioritise beds and sofas before wardrobes so the essentials are sorted first.
Reassembly checklist:
- Lay all panels roughly in their final positions and check every labelled bag is present.
- Insert dowels into the base panel first, then lower the side panels onto them.
- Engage cam locks finger-tight before tightening fully; this lets you square the frame.
- Check the frame is square (measure corner to corner diagonally; both measurements should match) before fitting the back panel.
- Fit the back panel last. It locks the frame square and adds rigidity.
- Rehang doors, refit shelves and rails, then check all cam locks are fully tightened.
Small repairs kit to bring with you: spare cam bolts, wood glue, extra dowels, a small pack of mixed screws, and a roll of masking tape.
Final safety step: refit wall-safety brackets for tall units and use anti-tip hardware anchored to a stud for any wardrobe over 76 cm (30 inches) high. Tip-over accidents are a known hazard with tall furniture that isn’t anchored.
Pro Tip: Wardrobe boxes are useful for keeping hanging clothes protected during transit, but they’re not a substitute for proper panel protection. Use wardrobe moving boxes for clothes, and blankets and straps for the panels themselves.
When should you hire a removals or man-and-van service in the UK for dismantling wardrobes for moving ?
Some jobs are genuinely better handed over. Here’s when it makes sense:
- Complex fitted wardrobes with multiple sections, ceiling-height units or unusual wall fixings.
- Large solid timber pieces that can’t be dismantled and need specialist lifting equipment or a two-person team.
- Awkward staircases with tight turns or low ceilings. Techniques for moving bulky furniture on stairs require experience to execute safely.
- Limited time: a professional two-person team can dismantle, load and reassemble a wardrobe in a fraction of the time it takes solo.
What UK services typically include: movers commonly offer furniture disassembly and reassembly as part of their service, but always confirm upfront whether tools, hardware bagging and wall-hole filling are included in the quote, or charged as extras.
Insurance: check that the provider carries liability cover for damage in transit. For mirrored doors or high-gloss finishes, ask specifically about add-on protection for fragile surfaces. A man-and-van service with insurance included is worth the premium over an uninsured option.
A mover’s honest perspective on wardrobe jobs, part of dismantling wardrobes for moving
The jobs that go wrong almost always share one thing: someone tried to force a panel before checking for every fixing. A PAX unit with a hidden wall bracket, a sliding door with a soft-close runner still clipped on, a fitted wardrobe with a screw buried under a decorative fascia. The damage is never from the disassembly itself; it’s from the moment someone loses patience.
The other consistent pattern is labelling. On jobs where the customer has bagged and labelled every fixing before we arrive, reassembly is fast and clean. On jobs where fixings are loose in a carrier bag, it’s a puzzle. That five-minute habit at the start saves thirty minutes at the end, every time.
For single wardrobe jobs, two people and an hour is usually enough. Whole-house teardowns with multiple fitted units are a different matter: plan for a full morning and have a clear system before you start. The disassembly itself is rarely the hard part. The hard part is keeping track of what came from where.
Van-247delivery handles the whole job for you
Dismantling a wardrobe yourself is absolutely doable with the right tools and a helper. But if you’re short on time, dealing with a fitted unit, or simply want the peace of mind that comes with insured professional handling, Van-247delivery takes care of the entire process across the UK.
The service covers disassembly at your current address, secure insured transport, and reassembly at the destination. You can add packing materials, a two-person team for heavy or complex units, or optional extra insurance for mirrored doors and high-gloss finishes. Booking is straightforward: get an instant quote for house removals online, or add disassembly as an add-on when you book a man-and-van. No guesswork on pricing, no surprises on the day.
Sources
- How To Dismantle A Wardrobe – Victorian Era
- How to Assemble Flat‑Pack Furniture Like a Pro: Complete Step‑by‑Step Guide for IKEA, Wayfair & Amazon Furniture in 2026 – TM International Group Blog
- Wardrobe Removal and Recycling – Divert Waste
- How to Assemble Furniture After a Move | Columbine Moving & Storage
FAQ
Do movers disassemble furniture in the UK?
Yes. Most UK removal companies and man-and-van services offer furniture disassembly and reassembly, but confirm upfront whether tools, hardware bagging and wall-filling are included or charged separately. Van-247delivery includes disassembly as an add-on to its UK-wide removal and man-and-van bookings.
How do you dismantle a wardrobe for moving?
Remove doors first, then work top → sides → base → back panel. Turn cam locks anticlockwise to disengage, check for dowels before pulling panels apart, and bag every fixing in labelled zip-lock bags. A single flat-pack unit takes 30–60 minutes with two people.
How much does it cost to dismantle a wardrobe in the UK?
Costs vary by provider, unit complexity and location. Man-and-van services typically charge hourly rates, while full removal companies may include disassembly within a job quote. Always request an itemised quote and confirm whether reassembly and insurance are included.
Do you have to dismantle furniture when moving house?
Not always, but it’s strongly advisable for flat-pack wardrobes, fitted units and any piece that won’t fit through doorways or stairwells assembled. Moving a wardrobe whole risks panel damage, chipboard splitting and injury from awkward lifts.