Pack non-essentials first, save your daily-use items for the last two or three days, and build one clearly labelled “open first” box before boxing anything else. Use dish-pack boxes with cell dividers for crockery and glassware, and keep cans, cast iron, and other dense items in small boxes so nothing gets too heavy to lift safely. That’s the whole strategy in a nutshell; everything below is how to execute it properly.
TL;DR:
- Pack non-essential items three to four weeks before moving, saving daily-use items for the last 48 to 72 hours to minimize disruption.
- Use dish-pack boxes with cell dividers for fragile items and small boxes for dense, heavy goods to prevent damage and ensure safe lifting.
- Wrap plates on their edge with packing paper to distribute pressure evenly and fill gaps tightly to avoid breakage during transit.
- Keep heavy boxes under 18 kilograms and label fragile and “this way up” clearly to prevent injuries and damage on moving day.
- Prioritize an open-first box with essential items like a kettle, basic cookware, and utensils to ensure immediate functionality upon arrival.
Table of Contents
- How long does kitchen packing take, and when should you start?
- What packing materials and box types do you actually need?
- What should you do with the pantry before packing it?
- What’s the best way to wrap and pack plates and crockery?
- How do you pack glasses and stemware safely?
- What’s the right way to pack pots, pans and lids?
- How should you pack small kitchen appliances?
- How do you pack knives without anyone getting hurt?
- How do you label boxes so unpacking is painless?
- What are the key moving-day safety rules for kitchen boxes?
- What a trade packer knows that most guides skip
- How do you handle a built-in kitchen table or fixed units?
- Should appliances and cookware be cleaned before packing?
- How do you consolidate items to use fewer boxes?
- How do you pack bulky, awkward items like trays and bakeware?
- How do you keep everyday utensils accessible during the move?
- What actually matters in a kitchen packing guide
- Need a hand? When professional packing makes sense
- Sources
- FAQ
How long does kitchen packing take, and when should you start?
Three to four weeks before moving day is the sweet spot to start on your kitchen. It’s the room people leave until last, then panic about, because it’s the one you use every single day. Start too early and you’re eating takeaway off paper plates for a month. Start too late and you’re wrapping mugs at midnight with the removal van outside.
The trick is phasing it. Extra Space’s moving guides recommend packing non-essentials three to four weeks out, then leaving daily-use items until the final stretch and preparing a dedicated open-first box for arrival day.
A workable phase plan looks like this:
- Weeks 3 to 4: Pack anything you rarely touch — the fondue set, the good china, spare serving platters, seasonal bakeware, novelty mugs from 2019.
- Weeks 1 to 2: Pack the “middle layer” — most pots, pans, small appliances you don’t use daily, and pantry overflow.
- Final 48 to 72 hours: Pack what’s left: daily plates, glasses, the kettle, basic cutlery, and whatever’s in the fridge that’s still edible.
Box counts scale with kitchen size. A one-bedroom flat kitchen typically needs several boxes, mixing small and medium sizes with one or two dish packs. A family kitchen with a full pantry and multiple appliances can run to many boxes. On the day before the move, do a final sweep for anything left on countertops. On moving morning, your only kitchen jobs should be unplugging the fridge and handing over the open-first box.
What packing materials and box types do you actually need?
Get this kit sorted before you touch a single plate, because the wrong box undoes good technique. A dish-pack box is a double-walled box built specifically for fragile items, and it’s worth the extra cost over standard cardboard. The reinforced walls stop crushing from the sides, which is exactly how plates crack in transit.
Here’s what to gather:
- Dish-pack boxes for plates, bowls, and serving pieces.
- Cell dividers (also called box dividers or glass cells) for stemware, tumblers, and mugs.
- Small boxes for anything heavy and dense: tins, cast iron, small appliances.
- Medium boxes for lightweight bulky items like Tupperware or mixing bowls.
- Unprinted packing paper, bubble wrap, and foam sheets for cushioning.
- Strong tape, a permanent marker, resealable freezer bags, and stretch film for lids and drawers.
Avoid printed newspaper for wrapping. The Spruce points out that the ink can transfer onto dishes and glassware, leaving smudges that need scrubbing off before you can use them again.
Reusing boxes is fine as long as they’re sturdy and dry, with no crushed corners. Supermarkets often give away sound boxes for free, and Van-247delivery’s packing materials list sets out exactly what to buy if you’re starting from scratch.
Pro Tip: Keep a roll of stretch film in the kit purely for wrapping drawer units and appliance cords. It takes seconds and stops small parts rattling loose.
What should you do with the pantry before packing it?
Sort everything into three piles before a single tin goes into a box: move, use up, and toss or donate. Anything opened, close to its date, or liquid-based (sauces, oils, vinegars) goes straight into the “use up” pile. Plan two or three meals in the final week specifically to burn through this stock, because feeding it to the bin is a waste of money and a waste of a box.
For what’s left, seal every lid tightly and double-bag anything liquid in resealable bags, so a leak stays contained rather than ruining a box of tins. Extra Space’s guidance on kitchen packing is blunt about weight: pack canned goods and other dense items in small boxes only, because a medium box packed solid with tins is genuinely dangerous to lift.
Practical pantry rules:
- Limit any single box to a weight you could carry up a flight of stairs without straining.
- Mark heavy pantry boxes “HEAVY” on at least two sides so nobody lifts blind.
- Donate unopened, in-date tins and dry goods you know you won’t use before the move.
- Keep spices and small jars together in one small box rather than scattering them across several.
What’s the best way to wrap and pack plates and crockery?
Reinforce the bottom of every dish-pack box with extra tape, then lay down a two-inch cushion of crumpled paper before anything touches the box. This base absorbs shock from below, which is where most breakages start.
Removalboxes’ step-by-step guide recommends wrapping each plate individually in two to three sheets of packing paper, then standing plates on their edge inside the box, like records in a crate, rather than stacking them flat. Plates stacked flat concentrate all the weight on the bottom one; plates on edge distribute pressure across the rim, which is the strongest part of the dish.
Work plate by plate:
- Lay a plate diagonally on two or three sheets of paper.
- Fold the corners over and tuck them under.
- Stand it upright in the box, tightest side against the box wall.
- Repeat, sliding each new plate snugly against the last.
Bowls can nest two or three deep, but only with a sheet of paper between each one. Never let ceramic touch ceramic directly. Keep plates and bowls in the lower two-thirds of the box, and finish with a thick layer of crumpled paper on top before sealing. Fill every gap tightly. A box that rattles when you shake it gently is a box that will arrive with damage.
How do you pack glasses and stemware safely?
Stuff the inside of every glass with crumpled paper before wrapping it externally. This isn’t optional for thin-walled tumblers: Upmove’s packing guide notes that unstuffed glasses can cave inward under the weight of items above them, even when the outside looks perfectly wrapped.
Cell dividers are the gold standard here. Extra Space’s research found that box dividers protect stemware more reliably than any wrapping technique alone, because each glass sits in its own compartment and can’t knock against its neighbours.
The method, glass by glass:
- Stuff the interior loosely with paper (not tight, just enough to hold shape).
- Wrap the outside in bubble wrap or several sheets of paper.
- Place upright into a cell divider slot, stem glasses base-down with extra padding around the fragile stem.
- Fill any remaining divider gaps with crumpled paper so nothing shifts.
Wine glasses need double the care their sturdy cousins do. Wrap the bowl first, then wind a strip of bubble wrap around the stem before setting it into its cell.
Never overpack a glass box. It’s tempting to squeeze in “just one more,” but a box that’s too full won’t seal flat, and a lid that bows means pressure on the glasses beneath during transit.
Pro Tip: Write “GLASS. This Way Up.” on all four sides of the box, not just the top. In a stacked van, only the sides are visible.
What’s the right way to pack pots, pans and lids?
Nest pots inside one another with a piece of cloth or paper between each layer, largest at the bottom. This keeps the stack stable and stops metal-on-metal scraping that dulls finishes over time.
Lids come off and get wrapped separately, then packed on their edge like small plates rather than stacked flat on top of the pots. A stack of loose lids on top of nested pans is one of the most common causes of a box that won’t close properly.
Cast iron deserves its own small box, one or two pieces maximum. It’s dense enough to make a medium box dangerously heavy, and a light coat of oil on the cooking surface before packing helps guard against rust picking up from any residual moisture during the move. Non-stick pans need soft separators, never crumpled paper alone, because grit trapped between two non-stick surfaces can scratch the coating permanently.
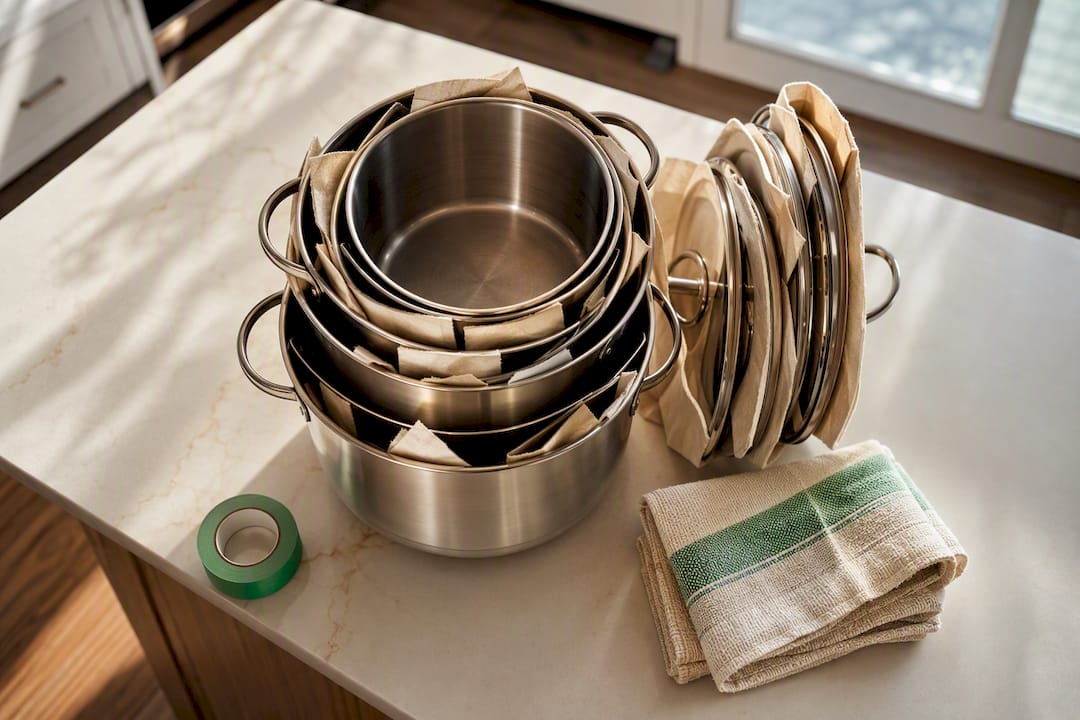
Fill any remaining cavities inside pots with smaller items like lids, trivets, or tea towels; empty space is what allows shifting in transit. Before sealing any pan box, lift a corner and gauge the weight. If it strains your wrist to tilt, it needs splitting into two boxes.
How should you pack small kitchen appliances?
Original boxes are always the best option if you’ve kept them, because they’re moulded to the appliance’s exact shape and cushion it properly. If they’re long gone, clean the appliance, let it dry fully, and remove every detachable part: blender blades, toaster crumb trays, kettle lids.
Bag each small part separately in a zip bag and tape that bag to the main appliance body, so nothing goes missing on the other end. Wind and secure cords with a twist tie or tape rather than letting them dangle loose.
Pad the appliance generously with paper or bubble wrap on all sides before boxing, and pack it upright in the box rather than on its side where that’s the appliance’s natural resting position. Mark the box clearly with the appliance name, not just “kitchen,” because you’ll want the coffee maker fast on arrival day. Van-247delivery’s guide on moving appliances covers cushioning technique in more depth if you’re dealing with anything larger, like a freestanding cooker or a dishwasher. When in doubt about a fragile part, tape a small labelled bag inside the box rather than leaving it loose.
How do you pack knives without anyone getting hurt?
Never let a loose blade go into a box. Slide each knife into a blade guard, a purpose-made sheath, or a taped cardboard sleeve cut to size, then bundle several together with a rubber band or tape.
If you use a knife block, wrap the whole block as one unit rather than removing every blade individually; it’s faster and just as safe. Write “CAUTION. SHARP.” on the box in bold letters, on the top and at least one side.
Peelers, mandolins, and kitchen scissors get the same treatment: guarded, bundled, labelled. Consider keeping the two or three knives you’ll actually need in the first few days out of the box entirely and carrying them with you in the essentials bag instead.
How do you label boxes so unpacking is painless?
A simple three-part label beats a vague scrawl every time. ReloPeak’s labelling advice suggests a format of zone, priority, and a one-line summary: something like “Kitchen. Open first. Coffee kit,” or “Kitchen. Unpack later. Baking trays.” That structure means whoever’s carrying boxes knows instantly where they’re going and whoever’s unpacking knows what’s inside without opening it.
Your open-first box is the one thing that should never get mixed in with the general pile. Pack it last, seal it separately, and keep it with you rather than in the van if you can.
What belongs in the open-first box:
- Kettle or coffee maker, plus coffee, tea, and mugs.
- One saucepan and one frying pan.
- A spatula, a wooden spoon, and a basic set of cutlery.
- Dish soap, a sponge, and a tea towel.
- One good knife and a chopping board.
Unpack in this order once you’re in: coffee station first (you’ll need it more than you think), daily dishes second, cooking kit third, pantry fourth, and rarely used items whenever you get round to it.
What are the key moving-day safety rules for kitchen boxes?
Weight is the safety issue that catches people out most. Aim to keep dense boxes under roughly 15 to 18 kilograms; if a box of tins or cast iron is heavier than that, split it across two small boxes rather than one medium one. Removalboxes’ guide makes the point clearly: a box that’s perfectly packed inside is still a liability if nobody can lift it safely.
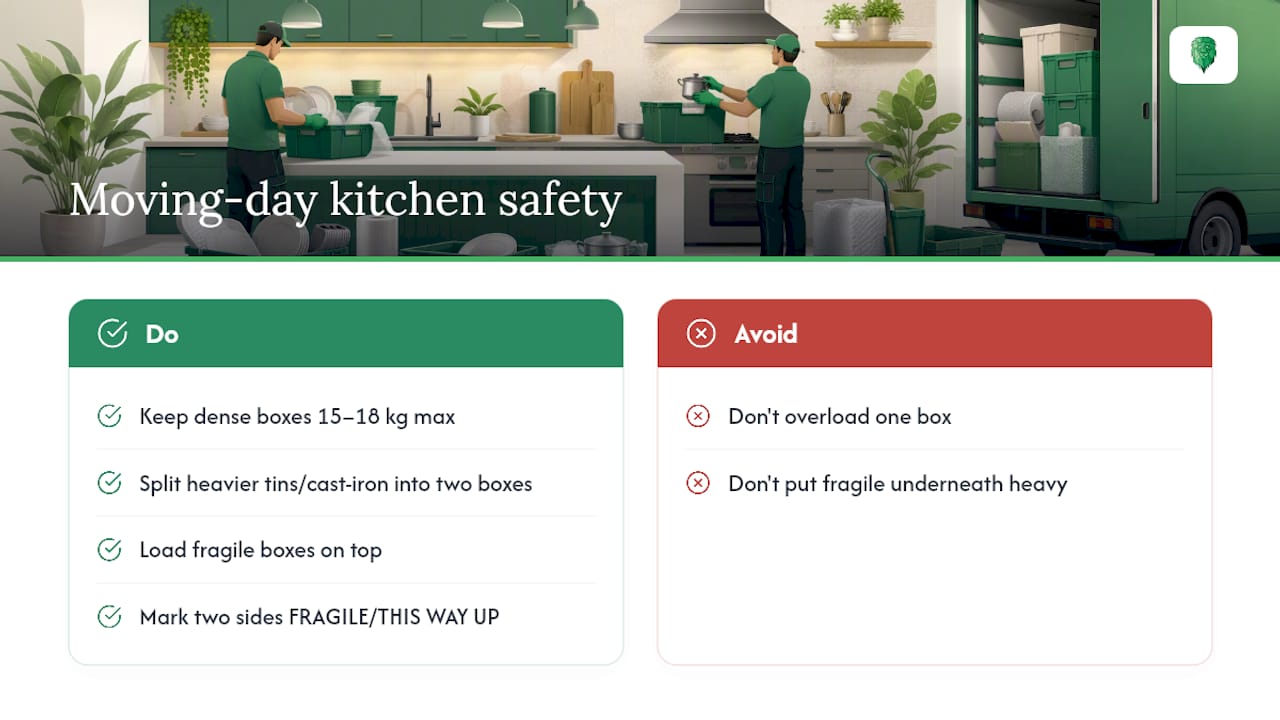
Load fragile boxes on top of the stack in the van, never underneath heavier ones, and make sure “FRAGILE” and “THIS WAY UP” are visible on at least two sides, not just the lid. Secure loose lids with tape and wrap anything oddly shaped in stretch film so it can’t shift during transit.
Before you close up the kitchen for good: unplug and defrost the fridge with enough lead time that it’s dry inside, double check pan and container lids are sealed, and do a last sweep of cupboards for anything left behind. Your open-first box travels with you, not in the removal van.
What a trade packer knows that most guides skip
Kitchens are the room professional packers dread and specialise in, in equal measure, because there’s no other room in the house with this density of breakables per square metre. Time pressure, a houseful of good stemware, or simply a kitchen too large to pack alone are the three situations where paying for professional help genuinely earns its cost.
Professional packers can typically get through a full kitchen in two to three hours, a job that often stretches across several evenings when tackled solo after work. That speed comes from technique repetition, but also from a trick worth borrowing regardless of who’s packing: staging a handful of labelled essentials boxes right at the back of the van, ready to be the first thing off, so there’s a working kitchen within the hour of arrival rather than by evening.
Van-247delivery’s own packing service, backed by insured transport and over 15 years in UK removals, follows this same principle: pack for protection first, but never lose sight of what needs to come out first.
How do you handle a built-in kitchen table or fixed units?
Freestanding kitchen furniture, breakfast bar stools, or a slot-in table, needs the same disassembly logic as any furniture elsewhere in the house. Remove legs, shelves, and any glass inserts before the move rather than trying to wrap a whole assembled unit. Bag every screw, bolt, and bracket in a labelled zip bag and tape it to the largest matching component, so reassembly on the other end doesn’t turn into a hunt through five boxes.
Fixed units, integrated shelving, wall-mounted spice racks, built-in wine racks, generally stay with the property unless your tenancy agreement or sale contract says otherwise. Check that in writing before you start unscrewing anything; removing a fixture that’s legally part of the sale can create a dispute you don’t want mid-move.
For anything with a glass front, like a display cabinet door or a glazed dresser, remove the glass panel entirely if it lifts out, and wrap it flat between two sheets of cardboard rather than transporting it in situ. Flat glass travels far better horizontal and padded than vertical and exposed to vibration.
If a table or unit is too heavy or awkward for one person, this is exactly the scenario where a man with a van service earns its keep, since proper lifting technique on stairs matters as much for furniture as it does for boxed china.
Should appliances and cookware be cleaned before packing?
Yes, always, and it matters more than people assume. A fridge or freezer needs defrosting and drying at least 24 hours before moving day, because trapped moisture becomes a mould problem the moment the door stays shut in transit. Wipe the interior dry and leave the door slightly propped during the final hours before loading.
Cookware needs to be properly dried, not just rinsed, before it goes into any box. Damp pans wrapped in paper create a humid pocket that can start rust on cast iron within days and leaves a musty smell on non-stick coatings. Give pans a final towel dry and let them air for an hour before wrapping.
Small appliances with removable water reservoirs, kettles, coffee machines, steamers, need those reservoirs fully emptied and left open to air dry. A kettle packed with residual water inside is a genuine leak risk that can soak straight through a cardboard box and onto whatever’s underneath.
Bin liners, food waste, and anything from the fridge that won’t survive the journey should go out with the rubbish the morning of the move, not get discovered a week later in a box marked “misc.” A quick final wipe-down of every appliance surface before it’s wrapped also means you’re not unpacking a dirty item straight into a clean new kitchen.
How do you consolidate items to use fewer boxes?
Every half-empty box is wasted cardboard, wasted van space, and one more thing to carry. Before you seal anything, look for genuine consolidation opportunities rather than packing room by room in strict isolation.
Nest smaller items inside larger ones wherever the fit is snug: mixing bowls can hold smaller Tupperware, larger pans can carry wrapped lids or trivets in their cavity, and a stockpot makes a surprisingly good home for a set of measuring jugs. Kitchen textiles, tea towels, oven gloves, dish cloths, double as free padding material rather than sitting in their own separate box, which cuts down both box count and packing paper use.
Group by category and fragility rather than by cupboard. It’s tempting to empty one cupboard into one box, but that often mixes a fragile teapot with a set of heavy tins, which is exactly the combination that causes breakage. Sort fragile-with-fragile and heavy-with-heavy instead, even if that means a box holds items from three different cupboards.
Before taping anything shut, do a genuine gap check: shake the box gently. If you hear movement, there’s wasted space that either needs filling with paper or reorganising to fit one more item. A box packed to genuine capacity, safely, is worth two boxes packed at half capacity.
How do you pack bulky, awkward items like trays and bakeware?
Flat, oversized items are one of the trickiest categories precisely because they don’t fit neatly into a standard box. Large baking trays, chopping boards, and oven racks are often better wrapped and stood vertically along the side of a large box, rather than forced flat where they take up an entire layer on their own.
Wrap sharp-edged bakeware corners in extra bubble wrap, since thin metal edges on roasting tins can puncture through a single layer of paper. Stack trays of similar size together with a sheet of paper between each, bundled with tape so they move as one unit rather than sliding independently.
Wooden chopping boards need a light wipe with food-safe oil before a long move if they’re going to sit unused for more than a couple of weeks, since wood can dry out and crack in an unventilated box. Silicone bakeware is genuinely one of the easiest categories: it flexes, so it can be rolled or nested inside other items without risk.
For genuinely oversized pieces, a large roasting tin that won’t fit any box, a pizza stone, a paella pan, wrapping in a double layer of stretch film and transporting it flat and separate from boxed items is often safer than forcing it into a container it doesn’t fit; Natural Stone Tile Freight Delivery: What Buyers Must Know covers important freight and packing considerations for heavy, fragile stone items like these.
How do you keep everyday utensils accessible during the move?
Losing the potato peeler for three weeks inside a box marked “misc. kitchen” is one of the most common small frustrations of moving. Utensil roll-ups, the fabric or vinyl wraps designed for camping cutlery, work surprisingly well for a house move too: they keep spoons, whisks, and tongs organised and visible rather than loose in a drawer-shaped void.
Small clear containers or zip bags grouped by task (baking tools together, cooking tools together, serving tools together) make far more sense than one giant drawer tipped wholesale into a box. When everything’s visible through clear plastic, you’re not unwrapping five items to find the one you need.
Keep one small “working kit” of daily tools, a peeler, a sharp knife, a wooden spoon, tongs, aside from the main pack entirely, ideally in the same bag as your open-first essentials. That’s the difference between cooking dinner on night one and ordering takeaway again because the tin opener is buried under six boxes in the garage.
What actually matters in a kitchen packing guide
Most kitchen packing advice online repeats the same five steps in a slightly different order, and most of it is fine as far as it goes. What it consistently underweights is timing discipline and box weight, the two failure points that cause the most damage and the most back strain, respectively.
The conventional wisdom treats wrapping technique as the whole game. It isn’t. A beautifully wrapped set of plates in a box that’s too heavy to carry down a staircase will still be a set of plates that ends up dropped on the landing. Weight management deserves equal billing with wrapping technique, not a footnote.
If there’s one priority above all others, it’s the open-first box. Readers who skip every other piece of advice in this guide but nail that one box arrive to a kitchen that functions within the hour, coffee made, a pan to hand, a knife that isn’t buried under six boxes of crockery. Everything else in this guide exists to protect what’s fragile. That one box exists to protect your sanity on day one.
— Claudiu
Need a hand? When professional packing makes sense
Professional packing services are the practical alternative when your kitchen has grown too large, too fragile, or too time-pressured to pack alone. A full china cabinet, a serious stemware collection, or simply a house move happening in five days rather than five weeks are exactly the situations where a professional pack pays for itself in avoided breakages and reclaimed evenings.
Packing add-ons and insured transport are both available directly through the house removals service, alongside instant online quotes so you know the cost before you commit. If your kitchen is small and you mainly need labour and a van rather than a full pack, the man with a van option covers that without the full-service price tag. Either way, get a quote before your final week arrives, not the night before, so packing materials and a slot in the schedule are ready when you need them.
Sources
A few guides go deeper on specific techniques than this article had room for:
- How to pack a kitchen for moving | Extra Space
- How to Easily Pack the Kitchen | The Spruce
- The complete guide to safely packing kitchen items for moving | Removalboxes
FAQ
What is the most efficient way to pack a kitchen?
Pack in phases: non-essentials three to four weeks out, a middle layer one to two weeks out, and daily essentials only in the final 48 to 72 hours, finishing with one dedicated open-first box.
What are 20 essential kitchen items to keep accessible?
A workable core list covers a kettle, mugs, one pan, one pot, basic cutlery, a sharp knife, chopping board, spatula, wooden spoon, tin opener, dish soap, sponge, tea towels, plates, bowls, glasses, tea and coffee, salt and pepper, a peeler, and rubbish bags. Keep these out of deep storage boxes so they’re the last thing packed and the first thing unpacked.
How long before moving day should I start packing the kitchen?
Start three to four weeks before moving day for a full kitchen, packing non-essentials first and leaving daily-use items until the final few days.
What items should every kitchen have after a move?
Priority items for day one are a kettle or coffee maker, one pan and one pot, basic cutlery, a knife, dish soap, and mugs, all of which belong in the open-first box rather than the general pack.
Is it worth paying for professional kitchen packing?
It’s worth considering when you’re short on time, own a large collection of stemware or china, or simply have a bigger kitchen than you can pack solo, since professional packers can typically finish a full kitchen in two to three hours.